A basement can look dry, clean, and finished while still letting soil gas slip through the slab every hour. A radon mitigation system is meant to pull that gas from below the concrete before it enters the rooms where your family breathes, works, stores holiday boxes, or watches TV. In the U.S., the EPA says homes should be fixed at 4 pCi/L or higher, and it also says homeowners should consider action between 2 and 4 pCi/L because no exposure level is known to be safe. That means this is not only a “basement problem.” It is an indoor air problem with a pipe, fan, and testing plan behind it.
The good news is that the work is more logical than it looks. You test, choose the suction point, drill the slab, route the pipe, mount the fan outdoors or in an unoccupied space, seal the right openings, then retest. Good planning matters more than brute force, and that is where practical home improvement guidance can help homeowners think through the project before the first hole is made.
Planning a Basement Radon Mitigation System Before Drilling
A good install starts with a boring question: where is the radon coming from, and how will air move under this slab? Many homeowners skip that part because they want action, yet the cleanest-looking basement may be harder to treat than the rough one with obvious cracks. A tight slab over packed soil can resist suction, while an older slab over gravel may respond fast. That is why planning should begin with test results, foundation type, and the basement layout. A finished recreation room in Ohio, a block-wall basement in Pennsylvania, and a poured-wall basement in Colorado may all need the same basic goal, yet each one can call for a different pipe route. The system is not decoration. It has to pull air from a hidden pressure field under the floor.
Read the test result before choosing the fix
Start with a radon test taken under proper conditions, not a guess based on your county map. The EPA says every home should be tested because maps cannot tell you what is happening inside one specific house. A neighbor’s low reading does not clear your basement, and a high-radon ZIP code does not prove your home has a high reading.
A short-term test can flag a problem fast, but a long-term test gives a steadier view of the house across weather changes. Winter readings often get attention because closed windows, stack effect, and warm indoor air can pull more soil gas upward. Still, a July reading can matter too, especially in a basement with a strong HVAC return or a leaky sump basin.
Before basement radon removal begins, write down the number, test location, date, and whether doors and windows stayed closed as required by the kit instructions. A contractor should ask for this. If nobody asks, that is a warning sign. The number helps size the response, but the house decides the layout.
Map the slab, sump, cracks, and pipe path
Walk the basement slowly. Look for a sump pit, floor drains, expansion joints, plumbing penetrations, old patch marks, and hollow-sounding spots in the slab. A common suction point is near the sump or a central open area, but “common” is not the same as correct. A pipe that looks neat yet pulls from the wrong place can leave pockets of radon behind.
Sub-slab depressurization works by creating lower pressure below the concrete than inside the basement. In plain English, the fan gives soil gas an easier path outdoors than through cracks near your furnace, laundry room, or storage wall. That pressure field has to reach far enough under the slab, which is why installers may test suction with small diagnostic holes before final routing.
Think about the pipe path at the same time. The shortest route is not always the smartest route. A vertical run through a closet may be quieter and easier to hide than a pipe snaking across a finished ceiling. In a ranch house with an unfinished utility corner, the route may feel obvious. In a finished basement with a bathroom, wet bar, and drop ceiling, the planning takes more care. A five-minute sketch can prevent a pipe from landing where a future cabinet, egress window, or built-in shelf is supposed to go.
Step-by-Step Installation From Suction Point to Fan
Once the layout makes sense, the work becomes a controlled sequence, not a random pile of PVC parts. Each step supports the next one, and a rushed step can make the setup noisy, weak, ugly, or hard to service later. The non-obvious part is that sealing alone rarely solves a high reading. Sealing helps the fan do its job, but it usually cannot stop soil gas by itself because concrete and foundation joints are not airtight barriers. The stronger play is pressure control below the slab, then sealing as support. A careful installer thinks like air: where can it enter, where can it escape, and which path will it choose when the fan starts? That mindset keeps the work practical instead of cosmetic, and it helps control project costs early.
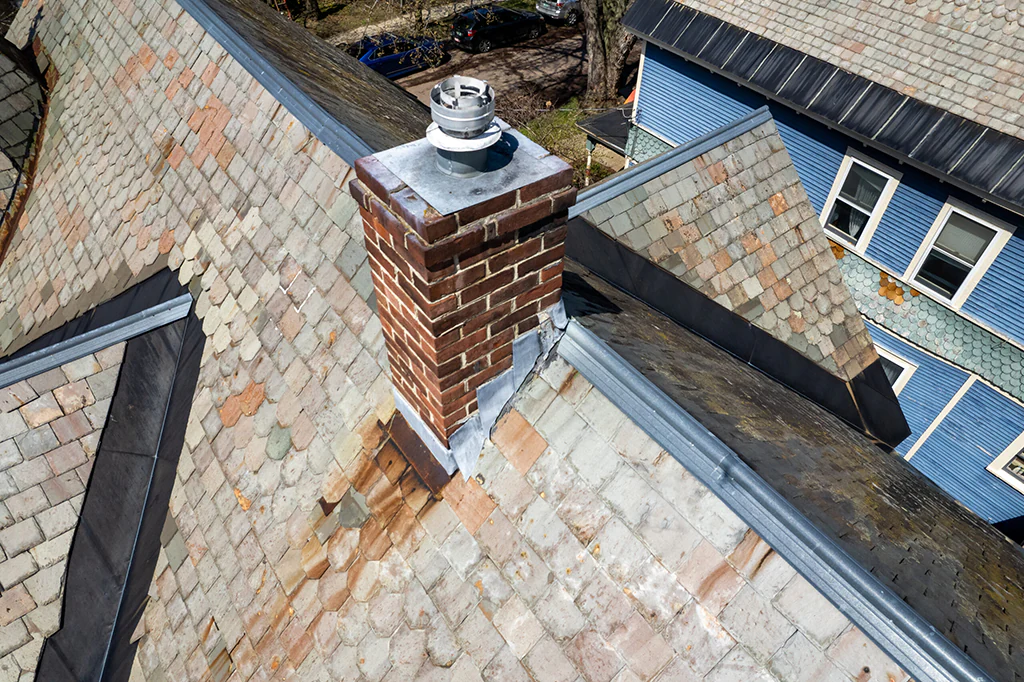
Drill the suction pit and set the vertical pipe
The installer marks the suction point, drills through the slab, and removes enough material below the opening to create a small pit. That pit gives air room to gather before it enters the pipe. In many U.S. basements, the slab rests on gravel, which can move air well. In older homes, the slab may sit over sand, clay, rubble, or mixed fill, and that can change the plan.
The pipe is usually PVC, often 3 or 4 inches wide, but sizing should follow the house and fan choice. The bottom of the pipe must be sealed at the slab surface so basement air is not pulled straight into the system. If the fan steals air from the room instead of from under the slab, the setup may look active while doing little where it counts.
This step also sets the tone for the whole job. A rough opening, loose pipe, or thin ring of sealant can become a weak point. The concrete patch does not need to look fancy, but it should grip, seal, and survive normal basement use. If storage bins or a laundry cart will sit near the pipe, the layout should protect it from daily bumps.
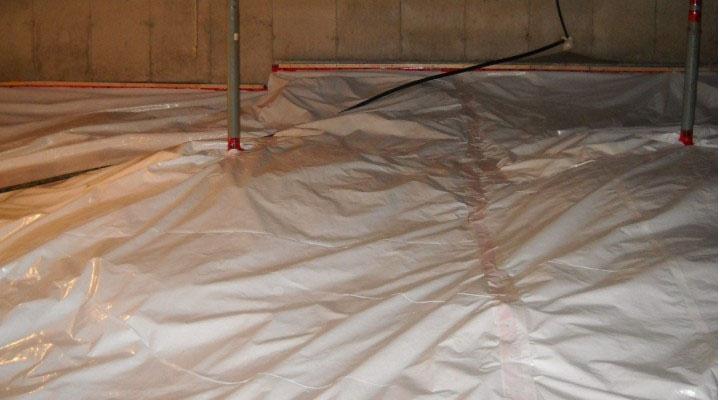
This is also where basement waterproofing before finishing walls connects with radon work. Water entry and soil gas entry often share paths. A damp crack near a footing, a loose sump lid, or a broken floor drain cover can affect comfort, moisture, and radon control at the same time.
Route the pipe and place the fan correctly
The fan should not sit in the living space or basement. If a leak forms on the pressure side of the fan, radon-rich air could be pushed into the home. That is why fans are commonly mounted outdoors, in an attic, or in a garage or other non-living area when codes and manufacturer instructions allow it. The discharge point also needs proper clearance from windows, doors, and openings.
A clean radon vent pipe installation keeps the pipe rising, limits sharp turns, and supports the run so vibration does not travel through framing. The fan needs power from a proper electrical connection, not an extension cord. A licensed electrician may be needed, and some states or local programs have specific rules for who can install or activate radon equipment.
The discharge pipe should release gas above the roofline or at a code-approved location where it will not drift back inside. This detail can feel fussy until you stand outside on a still day. Air does not always move the way people expect. A pipe ending near a second-floor window, soffit vent, or patio door can send the problem around in a circle. Snow country adds another detail: the termination should stay clear after a storm, not vanish behind a drift or ice at the eave.
Sealing, Electrical Work, and Quiet Performance Details
After the main pipe and fan are set, the job shifts from big visible parts to small details, which is where strong installers separate themselves from rushed ones. The house may already have dozens of tiny air paths, and each one steals a little pressure from the area under the slab. The quiet lesson here is that a lower-noise setup is often a better-built setup. Noise does not prove strength. Sometimes it proves vibration, poor pipe support, tight bends, or a fan fighting a bad suction point. A basement should not have to sound like a shop vacuum to be safer.
Seal the openings that weaken suction
Seal cracks, gaps around pipes, the edge of the sump lid, open block-wall tops, and floor-wall joints where practical. Do not expect caulk to be the hero. Its job is to reduce unwanted air leakage so the fan can pull from below the slab with less waste.
For basement radon removal in a home with a sump, the lid deserves special attention. A thin plastic cover with loose edges can leak air, noise, and moisture. A proper airtight lid can still allow pump service, but it needs gaskets, sealed pipe penetrations, and a viewing port or access plan. In homes with drain tile, the sump may become part of the suction pathway, so it cannot be treated as an afterthought.
Block-wall basements can add another wrinkle. Hollow block cores may carry soil gas upward even when the slab suction point works. Some homes need block-wall suction along with sub-slab depressurization. That sounds like extra work, but it can be the cleaner answer when radon is moving through the wall system instead of only the floor. A row house with shared foundation walls may need even more care, since air can move through old masonry paths that no one sees during a normal walk-through.
Wire, label, and monitor the fan
Every active setup needs a way to confirm the fan is running. Many systems use a U-tube manometer on the pipe. It does not show the radon level. It shows that the fan is creating suction, which is still useful because a failed fan can sit silent for weeks before anyone notices.
Label the pipe so future owners, plumbers, painters, and roofers know what it is. A plain note near the manometer can prevent mistakes later. You do not want someone cutting into the pipe during a basement remodel because it looked like an abandoned plumbing chase.
Noise control also belongs here. Rubber couplings, solid pipe brackets, fan placement, and smart routing can keep vibration out of bedrooms and living rooms. One Colorado homeowner might accept a little hum in an unfinished garage. A family in a Cape Cod with a bedroom above the fan may care more. The right choice depends on the people in the house, not only the reading on the test kit. Ask where the fan will be heard at night, because daytime installation noise can hide a tone that becomes annoying at 2 a.m.
Retesting, Maintenance, and When to Call a Certified Pro
The install is not finished when the last pipe bracket goes up. It is finished when the home tests lower and the owner knows how to keep an eye on the setup. That last part is where many projects get sloppy. A radon setup should become part of home maintenance, like checking smoke alarms or changing HVAC filters. The counterintuitive point is that a perfect-looking install can fail the follow-up test, while a plain-looking one can perform well. The test result matters more than the neatness of the pipe run. Beauty helps resale. Measurement protects the home. It also keeps future repairs honest.
Test again after the fan has run
After installation, run a follow-up test to confirm the system is working. The CDC advises retesting after a reduction system is installed, retesting every two years, and testing again after remodeling. That advice fits real life because basements change. A new egress window, finished wall, drain repair, or HVAC change can alter pressure.
Do not place the test beside the pipe or fan. Test in the lowest lived-in level, following the kit directions. If the basement is finished and used as a family room, office, guest suite, gym, or bedroom, treat it as living space. If the reading stays high, the installer may need to add a second suction point, change the fan, seal missed openings, or address block-wall pathways.
Keep the report. Buyers may ask for proof later, and some relocation or real estate deals move fast. A clean file with the original test, install record, and post-work result can save stress during a sale. Tape a service note near the electrical switch too, especially if the fan has a known lifespan or the installer recommends a future inspection.
Know when DIY stops making sense
Some handy homeowners can seal cracks, replace a sump lid, or help plan a pipe route. Full radon vent pipe installation is different because it combines concrete drilling, pressure diagnostics, exterior routing, electrical work, roof or wall discharge, and code clearance. Mistakes can push radon the wrong way or create water, fire, noise, or resale headaches.
A certified or state-licensed radon professional is worth considering when the reading is high, the basement is finished, the home has block walls, the slab has multiple sections, or the house has a crawl space tied to the basement. Standards matter too. EPA points homeowners toward radon standards of practice that cover testing and mitigation decisions for homes and other buildings.
Ask for the planned suction point, fan location, discharge route, warranty, post-install test plan, and proof of credentials. A good contractor will explain tradeoffs without acting offended. If the answer is “we always do it this way,” keep asking. Houses are too different for one canned answer.
Conclusion
Radon work feels less intimidating when you stop seeing it as a mystery and start seeing it as air pressure management. The slab, sump, cracks, block walls, fan, and pipe route all have roles. None should be treated as a spare part.
A well-planned radon mitigation system gives soil gas a controlled path outdoors, then proves its work through retesting. It does not need to make the basement ugly, and it should not turn into a noisy machine hanging off the side of the house. The best installs are measured, quiet, labeled, and easy to monitor.
For U.S. homeowners, the smart move is simple: test first, plan around the actual foundation, hire qualified help when the job moves beyond basic sealing, and keep the post-install result with your home records. If your basement is also part of a remodel, pair radon planning with basement remodeling safety checks before walls hide the details. Clean air starts below your feet.
Frequently Asked Questions
How much does basement radon work cost in the U.S.?
Most projects cost less than major basement remodeling, but pricing changes with foundation type, pipe route, fan choice, region, and finish level. A simple unfinished basement may be straightforward. A finished basement with block walls, a sump, and limited pipe access can cost more.
Can I install a radon fan in my basement?
The fan should not be placed in lived-in space. If the pressure side leaks, radon-rich air may enter the home. Fans are commonly installed outdoors, in attics, garages, or other approved non-living areas, depending on local rules and product instructions.
What is the best method for radon under a basement slab?
Sub-slab depressurization is often the main method for basement slabs because it pulls soil gas from below the concrete before it enters the home. Some houses need added measures, such as sump suction, drain-tile suction, or block-wall suction.
Do I still need to seal cracks after adding a fan?
Yes, but sealing is support work, not the whole fix. Sealed cracks and sump openings help the fan pull from below the slab instead of wasting suction on basement air. Sealing also helps with moisture, odors, and pests.
How long should I wait before retesting after installation?
Many homeowners retest after the fan has run long enough for the house air to settle under normal conditions. Follow your contractor’s guidance and test kit directions. Keep the follow-up result with your home records for future maintenance or sale.
Will this work in a finished basement?
Yes, but the route takes more planning. Pipes may need to pass through closets, utility rooms, chases, or exterior walls to avoid damaging finished areas. A neat plan can protect trim, ceilings, flooring, and the look of the room.
Does a sump pit make radon worse?
It can become an entry path if it is open or loosely covered. In some homes, the sump also helps the system pull air from drain tile under the slab. The lid should be airtight while still allowing pump access.
Should I test for radon before buying a house?
Yes. Testing before closing gives you facts before negotiation ends. If the result is high, you can ask for repair, request a credit, or plan the work yourself. A low result is still worth saving with the inspection records.