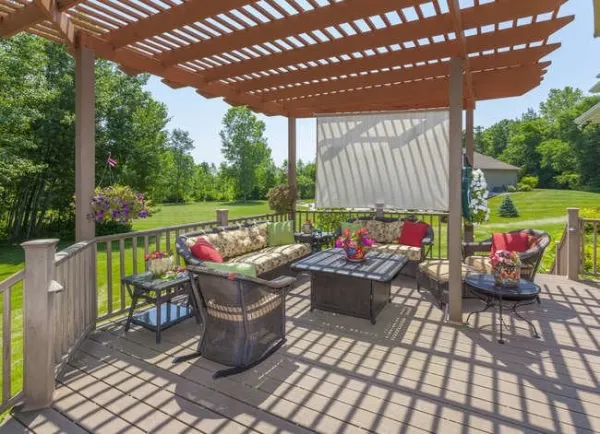
A dining table under harsh afternoon sun feels less like a backyard upgrade and more like a dare. The right shade sail attachment plan fixes that problem before anyone starts moving chairs into the last strip of shadow. For most U.S. homeowners, the goal is simple: create outdoor dining shade that looks clean, handles wind, drains rain, and does not punish the pergola frame every time the fabric tightens. That means your first job is not buying fabric. It is choosing where the pull will go.
A pergola can make a great support, but only when the sail connects to real framing, not trim, thin boards, or a decorative cap. If you are planning a patio project and comparing ideas from American home improvement planning, treat the sail like a tensioned surface, not like a curtain. The fabric may look light in the box. Once stretched across a dining area, it becomes a small roof with attitude. Better planning turns that force into comfort instead of repairs.
Start With the Pull, Not the Fabric
Most shade problems begin with a pretty rectangle drawn over the patio. The homeowner imagines full coverage over the table, the grill, and the walkway. Then the hardware arrives, and the real world speaks up. One pergola post is too low. A wall corner has no framing behind it. A tree branch swings. The sail that looked clean on paper starts asking for anchor points that do not exist.
The fix is to plan from the pull points outward. Stand in the outdoor dining area at the time you use it most. In Phoenix, that may be late afternoon when west sun hits low. In New Jersey, it may be noon on humid weekends. Run string from possible corner to possible corner. You will see the shape, the slope, and the blind spots before money gets spent.
Why anchor direction matters more than sail size
A sail wants to pull in straight lines from corner to corner. If one corner pulls sideways on a pergola beam, that beam may twist even if it feels solid by hand. This is where many clean-looking installs go wrong. The eye sees shade. The structure feels torque.
Think of a square dining table under a rectangular sail. If all four corners attach at the same height, rain can sit in the middle and weight the fabric. If one corner drops lower, water runs off. That lower corner may need its own post, not the nearest pergola rail. The better-looking answer is sometimes the weaker answer.
For a common 12-by-14-foot patio in suburban Dallas, two corners may attach to the pergola header while the other two land on steel posts set beyond the slab. The sail covers less pavement than the homeowner first wanted, but it shades the table better. Smaller and well-pulled beats wide and saggy.
Reading the sun before drilling holes
Outdoor dining shade should follow the people, not the patio outline. A sail centered over the slab may miss the chairs when the sun drops. Before drilling, put painter’s tape on the patio where the table sits. Check it at lunch, late afternoon, and early evening.
This sounds slow. It saves regret.
The non-obvious move is to shade the chair backs, not only the tabletop. People feel heat on shoulders, necks, and the side of the face. A sail that leaves the table half bright may still work if it protects the seated side from glare. That is why a shifted triangle can beat a centered square over a small bistro setup.
A pergola shade sail also changes how the space feels at night. If the fabric hangs too low, string lights glare under it and smoke from a nearby grill lingers. Keep enough headroom above the table so air can move, lights can sit below the beams, and guests do not feel boxed in.
Shade Sail Attachment Methods That Hold Up Outdoors
Once the geometry makes sense, the mounting plan has to respect the pergola. This is where the project becomes less about shade and more about load paths. A pergola post carries force down into the ground. A thin side board may only dress up the frame. Both may look like wood. They do not do the same job.
The safest installs connect to structural posts, beams, rafters, masonry, or dedicated shade posts. If the pergola attaches to a house, check local permit rules before treating the home wall as an anchor. The International Residential Code patio cover guidance is a good place to start because many local departments build from similar language, then add local wind and snow rules.
Through-bolts and eye bolts for wood pergolas
For wood pergolas, through-bolting beats screw-only mounting in many cases. A lag screw can work in the right member, but a through-bolt with washers spreads force across the beam. It also gives you a chance to inspect the opposite side. If the nut starts sinking into soft wood, the beam is telling you something.
Do not mount into a thin fascia strip and call it done. That strip may hide a beam behind it, or it may be trim with little holding power. Find the member that carries load. On a cedar pergola, that often means the main post or header, not the lattice top.
Use stainless or hot-dip galvanized hardware suited for exterior exposure. Mixed metals can stain wood or corrode faster near pools, coastal air, or treated lumber. In coastal South Carolina, for example, cheap plated hardware can look tired after one season. The sail may survive. The connection may not.
Wall plates, posts, and mixed anchor layouts
A pergola does not have to carry every corner. Mixed layouts often work better. One side can use a pergola beam, another can use a masonry wall plate, and the far corner can land on a separate steel post. The goal is not symmetry. The goal is clean tension.
When a wall plate goes into brick, block, or concrete, the fastener must match the material. Brick veneer is not the same as structural masonry. Stucco may hide wood framing, foam, or sheathing. Guessing here is expensive because a failed corner can damage siding and let water behind the wall.
Dedicated posts give the most freedom for a dining patio. They let you set height, angle, and drainage before the sail is ordered. The tradeoff is footing work. In windy parts of Oklahoma or along the Gulf Coast, that tradeoff may be wise. A post that looks overbuilt on calm days can feel like common sense when summer storms arrive.
Hardware Choices That Make Tension Easier to Control
The sail fabric gets attention, but shade sail hardware decides how the system behaves after the first week. Fabric stretches. Wood moves. Wind shakes the corners. Hardware gives you adjustment, release, and inspection points. Without it, the sail becomes a tug-of-war you cannot fine-tune.
A clean hardware run usually includes an anchor point, shackle, turnbuckle, and the sail’s corner ring or D-ring. Some kits include snap hooks, but they are not always the best choice for a permanent dining area. For long-term use, choose parts that lock, tighten, and stay readable during inspections.
Turnbuckles, shackles, and the problem with tight corners
Turnbuckles matter because they let you tension the sail after it hangs. Start them open enough that you can shorten them later. If you install them already closed, you have no room left to tighten the fabric when it relaxes.
A jaw-and-jaw turnbuckle holds better than many open-hook styles because the connection closes around the mating part. Bow shackles help when the corner angle is not exact. They give the system a little articulation without adding a long loose chain.
Too many homeowners try to make the sail corner land tight against the pergola. That looks tidy in a product photo. In a yard, it can remove the adjustment space you need. Leave room for hardware. A small gap with the right fittings is cleaner than a corner forced into place with a stretched strap.
Matching metal, fabric, and weather exposure
Shade sail hardware should match the site, not the cheapest kit online. Stainless steel resists staining and rust in many patios, but grade and finish still matter. Galvanized parts can be acceptable away from salt air if they suit the load and the hardware sizes match.
A poolside patio in San Diego has a different wear pattern than a shaded yard in Ohio. Chlorine, salt, irrigation overspray, and fertilizer dust all attack metal. If you see rust streaks under a fitting, do not treat it as a cosmetic issue. Rust can signal that the connection needs replacement or a better metal choice.
Fabric choice matters too. Water-resistant fabric and breathable mesh behave differently. Mesh reduces trapped heat and drains better. Water-resistant fabric gives more rain cover, but it needs a clearer slope. For a dining space, choose based on how you eat outside. A family that hosts sunny Sunday lunches may prefer airflow. A couple who wants light rain cover near the kitchen door may accept more slope and cleaning.
Keeping the Dining Area Comfortable, Dry, and Serviceable
A sail over a table has to do more than survive. It should make meals calmer. That means managing heat, glare, rain runoff, smoke, light, and the path people take with plates in hand. A technically sound install can still annoy everyone if it drops water onto the serving cart or blocks the view from the kitchen window.
Start with use. Where does the hottest chair sit? Where does the grill smoke travel? Where will rain leave the sail? Where will you stand to loosen the turnbuckles before a storm? Design feels personal, but maintenance decides whether you still like the setup in year two.
Slope, drainage, and dining comfort
A flat sail looks calm until water finds it. Then it sags, stretches, and pulls harder on every corner. Set one or two corners lower so runoff leaves the dining zone. The lower corner should not dump water at the door, on steps, or onto the person carrying food from the grill.
For a narrow patio behind a Chicago bungalow, a triangle sail can send water toward a planting bed instead of the back stoop. That may shade fewer square feet, but it protects the table and walkway. This is the quiet win: comfort comes from choosing the right miss.
Glare matters as much as heat. A pale sail can bounce light downward. A darker fabric may feel calmer over dinner, though it may absorb more heat. Test samples outside if you can. Indoor color tells lies under the sun.
Removable connections and storm habits
A sail should come down before severe wind, heavy snow, or weather the product was not built to handle. That does not mean the setup has to feel temporary. It means the connections should allow removal without a wrestling match.
Place at least one turnbuckle or shackle where you can reach it from a safe ladder position. Mark hardware pairs with small tags or notes so spring setup does not become a guessing game. Store the fabric dry, folded loosely, and away from sharp tools.
This is also where pergola maintenance checklist planning helps. Check the wood near each fitting, not only the metal. Look for crushed fibers, widening holes, split grain, loose nuts, and black staining around hardware. A five-minute inspection before patio season can catch the kind of problem that waits for a windy Saturday to announce itself.
Conclusion
A shaded dining area should feel easy, but the work behind it has to be disciplined. The best projects do not begin with the biggest sail or the fanciest kit. They begin with honest anchor points, measured sun, smart slope, and hardware you can tighten, inspect, and remove when weather turns rough.
Done well, shade sail attachment becomes part of the pergola’s design instead of a risky add-on. The fabric sits where people need relief. The pull runs into real structure. The dining table gets shade without trapping smoke, glare, or rainwater above the guests.
For U.S. homeowners, the smartest next step is simple: sketch the pull points, check local rules, and decide whether your pergola should carry the load or share it with posts. Then choose the sail. Build the support first, and the shade will feel like it always belonged there.
Frequently Asked Questions
How do you attach a shade sail to a pergola safely?
Use structural posts, beams, or rafters rather than trim pieces or thin slats. Through-bolts, eye bolts, shackles, and turnbuckles help create a connection you can tension and inspect. When in doubt, ask a local contractor to confirm the pergola can handle the pull.
Can a pergola shade sail stay up all year?
It depends on the fabric, hardware, climate, and wind exposure. Many residential sails should come down before severe wind, snow, or storms. Year-round use needs stronger anchors, weather-rated hardware, and routine checks for loosened fittings, stretched fabric, and wood movement.
What is the best hardware for outdoor dining shade?
A practical setup often includes stainless or galvanized eye bolts, bow shackles, D-rings, and turnbuckles. Turnbuckles are useful because they let you adjust tension after the sail relaxes. Avoid weak hooks or mystery metal kits in windy, coastal, or poolside locations.
Should a shade sail be flat or sloped over a dining area?
A sloped sail is better for most dining areas because it sheds rain and reduces sagging. One lower corner can direct runoff away from the table, door, or walkway. A flat sail may look neat at first, but water weight can strain fabric and anchors.
Can I attach a shade sail to a house and a pergola?
Yes, but the house connection must hit real framing, masonry, or a rated bracket system. Do not attach to siding, stucco skin, or brick veneer without confirming what carries the load behind it. Local code rules may also affect house-mounted shade plans.
How much space should I leave for shade sail hardware?
Leave enough gap between each sail corner and anchor for turnbuckles, shackles, and adjustment. Many poor installs fail because the sail was ordered too close to the anchor-to-anchor span. Measure from real fixing points, not from the patio edges.
Are triangle or rectangle sails better for pergolas?
Triangle sails are easier to slope and can look lighter over small dining areas. Rectangle sails cover more table space but need stronger alignment and better drainage planning. The better choice depends on sun angle, anchor locations, and where rain should leave the fabric.
Do I need a permit for a pergola shade sail?
Permit rules vary by city, county, HOA, wind zone, and whether the structure attaches to the house. Small fabric sails may face fewer rules, while permanent posts or house-mounted systems may need review. Call the local building department before drilling into structural members.