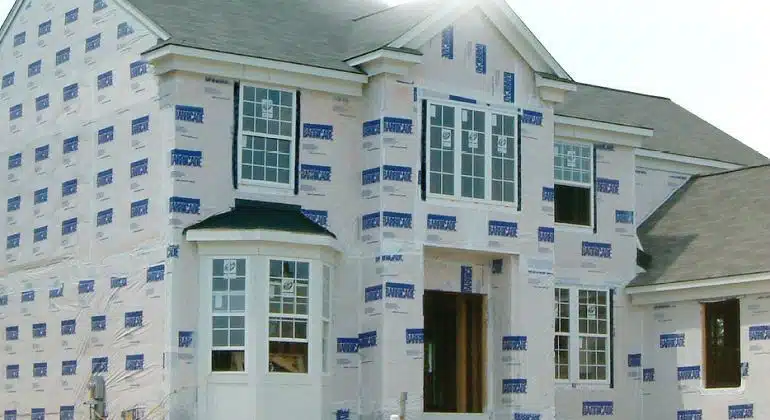
Siding gets blamed for leaks it never had the power to stop on its own. That is why house wrap installation deserves attention before the first panel, plank, or shingle covers the wall. The wrap is the backup drainage layer, the line that catches wind-driven rain after it slips past vinyl, fiber cement, engineered wood, or metal. U.S. model code expects exterior walls to have a continuous water-resistive barrier behind the wall covering, tied into flashing at openings and wall details. For homeowners planning a reclad, this is the moment to slow down, inspect the sheathing, and fix the weak spots that siding will hide for years. Good wrap work is not flashy. It is straight rolls, tight seams, clean laps, and patient cuts around windows. Yet it often decides whether a new exterior feels solid after the first storm. Before you price colors and trim profiles, study the wall like a weather path. The best home exterior improvement planning starts there, with water in mind.
Why the Wrap Matters More Than the Siding Catalog
Most homeowners shop siding from the street side. They compare color, reveal, texture, and curb appeal. Contractors look at those things too, but the better ones first ask what the wall behind the siding is doing. A beautiful exterior over a sloppy drainage plane is like a fresh coat over soft drywall. It may look finished, but the problem has only been covered. The wall’s hidden layers do not care whether the siding is charcoal, white, cedar-look, or board-and-batten. They care whether rain has a path down, whether air can sneak through seams, and whether the base of the wall can dry after a storm.
The siding sheds rain, but the wrap manages what gets behind it
No common siding system should be treated as a watertight shield. Vinyl moves. Fiber cement has butt joints. Wood swells and shrinks. Stucco can hold moisture longer than owners expect. Even careful siding work leaves paths for wind pressure, capillary action, and splashback at the base of the wall.
The wrap catches that water and sends it down and out. The DOE Building America Solution Center describes the drainage-plane approach as a practical way to handle rain that passes the cladding, with layers lapped over exterior flashings so water drains away from the building. That one idea should shape the whole job: every upper layer belongs over the layer below it.
Here is the odd part. A tiny backward lap can matter more than a long exposed wall. If water reaches a seam that is tucked the wrong way, the wrap can guide moisture inward instead of out. One wrong detail above a window can beat ten perfect courses on the open wall. Wind makes that worse because it does not let rain fall politely. It pushes water sideways, then up into small gaps, then back down through any mistake the layers allow.
Old siding removal is your only honest inspection window
Once old siding comes off, the wall tells the truth. You may find gray sheathing at a hose bib, swollen trim under a bedroom window, rusty nail streaks, or an old patch where someone chased a leak years ago. Do not rush past that evidence. New siding will not dry rotten sheathing, and wrap should not be asked to hide a damaged wall.
A practical U.S. example is a 1980s vinyl-sided home in Ohio with no visible indoor leak. Pull the siding, and the lower corners of two windows show black staining on the OSB. The wrap plan changes right there. The owner needs sheathing repair, better window flashing, and a tighter sill pan detail before any new siding goes on.
This is also where a siding replacement planning checklist earns its place. The wrap choice matters, but sequence matters more. Inspect, repair, flash, wrap, tape, then side. Skip one step and the project becomes cosmetic instead of protective. Take photos of each wall before it closes, especially around windows, doors, deck connections, and utility penetrations. Those photos are not busywork. They can help later if you add a light fixture, diagnose a leak, or sell the house to a buyer who asks how the reclad was done.
House Wrap Installation Details That Protect the Wall Before Siding
The cleanest jobs look boring while they are happening. Rolls are kept flat. Seams land where tape can reach them. Corners are wrapped without stress tears. Openings are cut with a plan, not carved up after lunch. That plain order is what turns a thin sheet into a working water-resistive barrier. The installer’s hands matter here. A careless cut can undo a premium roll, while a careful lap can make an ordinary product perform well inside its limits. Before the roll goes up, old nails, loose splinters, and raised sheathing edges should be handled. Flat walls are easier to wrap, easier to tape, and easier to side. That prep rarely shows in project photos, but it shows up years later in fewer wrinkles and fewer trapped pockets.
Start low, overlap high, and think like falling water
Work from the bottom of the wall upward. The lower course goes on first, then the course above laps over it. Many installers call this shingle fashion because it follows the same logic as roofing. Water should always meet the face of the lower layer, not the back edge.
At the bottom, do not trap water behind trim, foam, or starter strips. DOE guidance for wall base flashing calls for the flashing to sit under the bottom edge of the wrap or weather barrier so water can move out of the wall assembly. That detail can look small from the ground, but it is where splashback, snow melt, and wind-driven rain often test the system.
Corners deserve patience. Wrap around outside corners far enough to keep the corner from becoming a vertical seam. On inside corners, avoid pulling the material so tight that it bridges the corner and tears when temperature changes move the wall. Neat does not mean stretched. A little ease in the material can save a split later. Fasteners matter too. Cap nails or cap staples hold better than bare staples because they spread pressure over more surface. Fewer tears means fewer patches before siding day.
Where flashing tape earns its keep around windows and doors
Windows are the exam. A wall can be wrapped well across broad sheathing and still fail at one opening. The bottom needs a path out, the sides need protection, and the head flashing must shed water over the side pieces. Flashing tape works when it follows that order and bonds to clean, dry surfaces.
Do not tape the lower window flange shut in a way that blocks drainage unless the window system calls for it. Many leak repairs reveal the same mistake: every edge was sealed as though water should never enter. Better work accepts that some water may reach the opening, then gives it a clean exit.
For a patio door in Florida, that exit can decide the job. Wind pushes rain hard against the threshold. A sill pan, careful side flashing, and head flashing tied into the wrap can keep the subfloor dry. Without that path, the first sign may be a soft interior corner months later. A window flashing repair guide should sit beside the siding plan, not after it. Tape compatibility belongs in that plan as well. Some sealants and tapes do not bond well to certain wraps, foams, or dirty old surfaces. Matching the system sounds fussy until a strip peels loose behind finished trim.
Matching the Wrap Plan to Climate, Cladding, and Wall Shape
The same roll can behave in different ways on different houses. A dry Colorado wall with deep overhangs does not face the same pressure as a coastal Carolina wall with short eaves and wind-driven rain. Material choice matters, but the wall shape and siding type often matter more. Pay attention to roof overhangs, deck ledgers, roof-wall intersections, balcony doors, and walls that sit under little protection. These spots get punished first. A simple ranch with wide eaves may forgive small sins. A tall, chopped-up exterior with bump-outs and short returns will not. This is why two neighbors can buy the same wrap and get different results. One house has plain walls and generous roof lines. The other has a chimney chase, a low porch roof, three bay windows, and a deck ledger. The second house needs more patience, more flashing checks, and often more drainage space behind the finish.
New siding changes the drainage space you need
New siding is not a single condition. Vinyl usually leaves some incidental drainage behind it. Fiber cement lap siding can sit tighter, especially when trim details pinch the bottom edge. Stucco and adhered stone can hold water against the wall unless the assembly provides a drainage gap. That is where many remodels go wrong.
DOE retrofit guidance says to inspect for moisture damage before recladding and notes that a gap behind cladding helps air flow and drainage. It also gives examples such as a small gap behind lap siding, a larger space for stucco over plastic house wrap, and a 1-inch air gap behind brick or stone veneer. The point is not to memorize one number for every home. The point is to respect the cladding.
A non-obvious choice sometimes saves money: furring strips may be more useful than a premium wrap. If the old wall had staining behind tight wood siding, a better drainage gap can reduce future wetting more than swapping one brand name for another. The air space gives water somewhere to go. It also creates a straighter nailing surface on wavy old sheathing, which can make the finished siding look better. Protection and appearance can come from the same small gap.
Climate should change your risk tolerance
In cold northern states, air leaks through the wall can carry indoor moisture into cold layers, where it can condense. In hot, humid states, outdoor moisture can move inward during cooling season. The wrap alone does not solve either problem, but careless cuts, untaped seams, and missing penetrations make both worse.
Some wraps can also act as part of the air-control layer when seams are sealed. DOE notes that a drainage plane may serve as an air barrier when its seams are taped or otherwise sealed. That does not mean every wrap job becomes a perfect air barrier. It means the work can support comfort and durability when the crew treats seams, joints, and penetrations as part of one system.
Think about a tall gable wall in Minnesota. The crew may be tempted to leave upper seams loose because the siding will cover them. That is a poor bet. Wind pressure is stronger up high, and winter moisture problems often start where the eye cannot see. The wall does not care that the seam was inconvenient. In the Southeast, the weak point may be different: bulk rain at windows, porch roofs, and lower wall sections that stay damp after storms. The same goal remains, but the risk moves around the house.
Common Mistakes That Show Up Years After the Crew Leaves
Bad wrap work rarely fails with drama on day one. It waits. Then paint bubbles near a trim joint. A bedroom smells damp after spring rain. A lower course of siding grows algae faster than the rest. By then, the wall is closed, the invoice is old, and the repair costs more. The most expensive mistake is not always the worst-looking one. It is the one hidden behind a piece of trim no one wants to remove.
Tape cannot rescue dirty sheathing, wet wrap, or bad laps
Flashing tape is not magic. It needs the right surface, the right pressure, and a layout that respects water flow. Tape over dust, old caulk, wet wrap, or folded material, and you may get a neat-looking failure. Worse, the tape can create confidence the wall has not earned.
A common remodel mistake is installing wrap on a windy day, letting the sheets flap, and then taping wrinkles flat. Those wrinkles become channels. Water can sit at folds, and siding fasteners may hold the crease in place. A slower crew with fewer wrinkles often leaves a better wall than a faster crew with more tape.
Penetrations need the same care. Hose bibs, dryer vents, exterior lights, meter boxes, and deck ledgers all interrupt the sheet. Each one needs a plan for shedding water. A round vent cut like a rough star, then buried under a trim block, is not a detail. It is a future service call. Ask to see the treatment before the trim block covers it. You are not being difficult; you are checking the only moment when the work can be seen.
Do not confuse vapor movement with bulk-water control
Homeowners often hear that wrap “breathes,” then assume it can dry any mistake. That is the wrong lesson. Vapor movement is not the same as liquid water draining down a wall. A material can allow vapor to pass and still fail if water is directed behind it at a window head.
The International Residential Code language focuses on a continuous water-resistive barrier behind the veneer, carried to the top of walls and ended properly at penetrations and appendages. In plain terms, the wall needs a rain path, not a patchwork of hopeful pieces.
This is where a careful homeowner can ask better questions without micromanaging. Ask how the bottom edge drains. Ask how window head flashing ties into the wrap. Ask whether the crew will replace damaged sheathing before covering it. Those answers reveal more than a low bid ever will. Also ask what happens if rain hits before siding starts. Many wraps can handle some exposure, but every product has limits, and torn or wind-whipped areas should be repaired before the wall is covered.
Conclusion
A siding project is one of the rare times you can see the wall before it disappears again. Treat that access like a gift. The color choice may be what neighbors notice, but the drainage layer is what the house lives with through hail, heat, sideways rain, and freeze-thaw cycles. Good house wrap installation does not need theater; it needs clean laps, sound sheathing, careful openings, and a crew that understands water’s habits. The smartest owners are not the ones who buy the most expensive roll. They are the ones who make sure each layer works with the next layer. They ask for damaged sheathing to be replaced, not hidden. They expect flashing to be visible before trim covers it. Spend the extra attention before the siding goes on, because afterward every fix becomes slower and more expensive. Your best move is simple: walk the wall, question every opening, and make the hidden layer worthy of the new exterior.
Frequently Asked Questions
Is house wrap required before siding in the United States?
Most framed exterior walls need a water-resistive barrier behind the cladding under model residential code rules, though local amendments can differ. The safest path is to check your city or county building department and follow the siding maker’s written instructions.
Can new siding go over old house wrap?
It can in some projects, but only if the old wrap is intact, well-lapped, properly taped, and tied into flashing. Many reclads expose torn, brittle, or poorly cut material. When in doubt, replacement is cheaper than closing a weak wall.
What is the best wrap for fiber cement siding?
Choose a product approved for use behind fiber cement and suited to your climate. The bigger issue is drainage space. Fiber cement can sit tight to the wall, so rainscreen gaps or furring strips may help wet walls dry faster.
Should seams in house wrap be taped?
Yes, seams should be taped when the wrap maker calls for it and when the wrap is part of the drainage or air-control plan. Use compatible tape from the same system when possible, and press it firmly onto clean, dry material.
How far should house wrap overlap?
Follow the product instructions and local code, since lap requirements can vary by material and wall condition. As a field rule, the upper layer must always shed over the lower layer. Direction matters as much as lap size.
Does house wrap stop air leaks?
Some wrap systems can reduce air leakage when seams, edges, and penetrations are sealed with care. Loose sheets with open seams will not do much for air control. The wrap must be treated as a connected layer, not a loose cover.
What happens if siding is installed without a proper drainage layer?
Water that gets behind the siding can soak sheathing, framing, insulation, or trim. Damage may stay hidden until staining, odors, swollen panels, or interior leaks appear. Repair often means removing sections of the new exterior.
Can a homeowner inspect wrap work before siding goes on?
Yes. Look for shingle-style overlaps, taped seams, clean window and door flashing, sealed penetrations, and a clear path for water to exit at the bottom. Photos before siding goes up can also help with future repairs or resale questions.